

Choose hooks or clips that match your fence surface, then space them evenly and secure the light cord without stretching it. Adhesive clips suit clean, smooth finished fences; rail hooks fit compatible top rails, while screw-mounted hooks suit wood when drilling is acceptable.
Choose a Mounting Method for Your Fence
Check fence material and surface condition first. Adhesive products require dry, clean, flat surfaces, and several listed options exclude rough, dusty, oily, or wet surfaces. A fence rail hook needs a top edge and enough width for its adjustment range.
- Finished, smooth fence: Consider clear adhesive clips if the surface is clean, dry, and flat.
- Top rail: Consider adjustable over-rail hooks if your rail thickness falls within the hook’s stated range.
- Wooden fence: Screw-mounted hooks provide a mechanical attachment, but require screws and leave holes.
- Rough masonry or rough-sawn wood: Avoid adhesive clips that specify smooth surfaces only. Choose a mounting method designed for that surface.
How to Hang Christmas Lights on a Fence
1. Plan the light path
Measure the fence section and light string before mounting clips. Decide whether the lights will follow the top rail or form a gentle line across fence panels. Allow slack at corners and connections rather than pulling the cord taut.
2. Match clips to the fence
For adhesive hooks, clean and dry the mounting area as directed by the manufacturer. Follow the specified pressing and waiting period before hanging the cord. Adhesive suitability depends on surface finish, so do not use these clips on rough or damp areas when excluded by product instructions.
For adjustable rail hooks, fit the pad, set the hook to the rail width, and tighten its locking screw with the included screwdriver. For screw-mounted clips, attach them to suitable wood using the supplied screws. Avoid placing fasteners where they could split or damage the fence.
3. Attach lights and check the route
Place the cord in each hook without pinching or forcing it. Check corners, gates, and the route to the power source for snags or trip hazards. Follow the light manufacturer’s outdoor-use and electrical instructions, and keep connections protected as directed.
Fence Light Clips and Hooks to Consider
These options differ by mounting style, surface compatibility, and pack size. Choose based on your fence construction and installation preferences, not appearance alone.
Adjustable option for compatible rails
8 Pcs Adjustable Outdoor Light Hooks adjust from 3.2 to 6 inches and are described for patio deck or fence railings, as well as masonry walls. Protective anti-slip pads and locking screws come in the package.
Pros: Adjustable width, no-drill mounting, and included pads and screwdriver suit users who want to hang lights from a compatible top rail. Cons: The eight-hook pack may not cover a long fence, and rail width must fit the stated range. Who should skip it: Skip it if your fence has no accessible top rail or its thickness falls outside the adjustment range.
Clear adhesive hooks for smooth finished fences
30 PCS Hooks for Outdoor String Lights use clear adhesive clips and are intended for clean, flat surfaces, including finished fence siding. The instructions call for alcohol-pad cleaning, firm pressure for 30 seconds, and a 24-hour wait for maximum adhesion.
Pros: Clear clips avoid drilling and can blend with a finished fence. Cons: They are not suitable for rough, wet, oily, wallpaper, or dusty surfaces, and require a full curing period. Who should skip it: Skip it if fence texture is uneven or you need to hang lights immediately.
Adhesive clips with a larger cable opening
KGROTE 60Pcs Christmas Light Clips are the medium version, sized for cables up to 8 mm in diameter. The small version is listed for cables up to 5 mm, so compare cord thickness before choosing.
Pros: Sixty clips provide many attachment points, and the medium version accommodates thicker cable than the small version. Cons: Adhesion depends on a clean, dry surface; instructions specify pressing for 10 seconds and waiting two hours. Who should skip it: Skip it for rough fence boards or cords wider than the selected clip’s limit.
Screw-mounted clips for wood
50 Pack Hooks for Outdoor String Lights includes 50 hooks and matching screws. The product describes installation on wood with screws, making it a more direct option for wooden fence posts or rails when permanent holes are acceptable.
Pros: Screw attachment avoids dependence on adhesive bonding, and the pack offers many hooks for a longer route. Cons: Installation requires screws and may mark the fence; check that your light cord fits the hook opening. Who should skip it: Skip it if you rent, cannot drill, or want a no-hole installation.
Adhesive hooks with spare strips
Hooks for Outdoor String Lights Clips have a double-hook design and include four replacement adhesive strips. The product states a 5 lb capacity per hook on smooth, clean surfaces, but that claim does not establish suitability for every fence finish or weather exposure.
Pros: Spare strips support relocating hooks, and double hooks offer separate cord positions. Cons: The stated load applies to smooth, clean surfaces; used adhesive strips should not be reused. Who should skip it: Skip it for rough or dirty fences, or when you need a screw-fastened mount.

Pros
- Eight hooks included
- Adjustable 3.2- to 6-inch range
- No-drill installation
- Protective anti-slip pads included
- Mini screwdriver included
Cons
- Fit limited to 3.2- to 6-inch widths
- Who should skip it: users needing drilled or permanent mounts

Pros
- Large 200-clip quantity
- Broad string-light compatibility
- Gutter and shingle mounting
- Upward or downward bulb positioning
- No tools required
Cons
- Documented mounting options focus on gutters and shingles
- White clips may contrast with darker exteriors

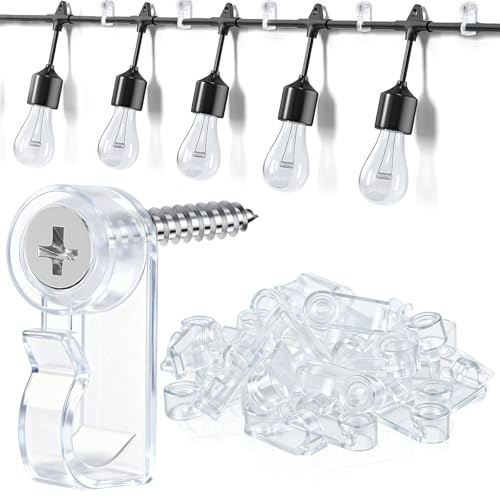
Pros
- 50 hooks and screws included
- Designed for outdoor and indoor decor
- Screw mounting for wooden beams
- ABS plastic construction
- Multiple decoration uses
Cons
- Screw mounting can leave holes
- Hook color is inconsistent in product details
- Who should skip it: renters needing damage-free mounting

Pros
- Includes 30 clips
- Clear finish blends with many surfaces
- Double-hook design
- Indoor and outdoor use advertised
- Works with several string-light types
Cons
- Not for rough, wet, oily, or dusty surfaces
- Requires 24-hour adhesion wait
- Who should skip it: renters or decorators needing removable hooks

Pros
- 50-piece set
- No-drill installation
- Transparent design
- UV-resistant material
- Suitable for several surface types
Cons
- Not recommended for brick, cement board, or rough-sawn wood
- Requires one-hour wait before hanging lights
- Skip if mounting on rough or uneven surfaces

Pros
- Generous 60-piece quantity
- Clear, discreet appearance
- No-drill adhesive installation
- Supports several smooth surface types
- Handles multiple cable organization tasks
Cons
- Limited to cables up to 5 mm
- Requires clean, grease-free surfaces
- Two-hour wait recommended before use
Pros
- 60 clips per box
- Clear, space-saving design
- No-drill adhesive installation
- Supports cables up to 8 mm
- Multipurpose cable organization
Cons
- Requires clean, dry surfaces
- Maximum cable diameter is 8 mm
- Skip if you need documented weather-rated mounting hardware
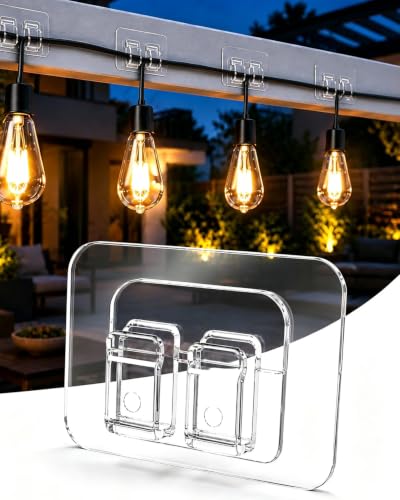
Pros
- 35 clips included
- Clear design blends with surfaces
- No tools needed for installation
- Fits lighting cords and several cable types
- Suitable for multiple dry, flat surfaces
Cons
- Not suitable for rough, wet, oily, dusty surfaces, or wallpaper
- Requires 24-hour curing before hanging loads
- Who should skip it: shoppers needing hooks for uneven surfaces

Pros
- 50 clips included
- Clear design keeps mounts less conspicuous
- No tools needed for installation
- Supports lighting and cable organization
- Advertised for outdoor use
Cons
- Unsuitable for rough, wet, oily, dusty, or wallpapered surfaces
- Requires 24-hour adhesive curing before hanging loads
- Skip if you need hooks for uneven surfaces
Installation and Safety Notes
Adhesive strength depends on surface preparation and curing time. Follow the exact instructions for the chosen clips, and do not hang lights before their stated wait period. Check attachments periodically, especially after weather changes, and replace any clip that loosens or cracks.
Use outdoor-rated lights and follow their electrical instructions. Do not overload outlets or connect strings beyond the manufacturer’s limits. Keep cords clear of gates, walkways, and areas where they could be pinched or damaged.
Frequently Asked Questions
Can I use adhesive clips on a wooden fence?
Yes, if wood has a smooth, finished, clean, dry surface and the clip maker lists wood as compatible. Rough-sawn or weathered boards may not provide the flat contact adhesive clips require.
How far apart should fence light clips be?
There is no spacing specification shared across these products. Follow the light maker’s support guidance, add attachment points where the cord changes direction, and avoid sagging or tension between clips.
Which mounting method avoids drilling?
Adhesive clips and adjustable over-rail hooks avoid drilling when used on compatible surfaces or rails. Adhesive options require careful cleaning and curing; rail hooks require a suitable top edge within their adjustment range.
Final Recommendation
Choose adjustable hooks for a compatible fence rail, adhesive clips for smooth finished surfaces, or screw-mounted hooks for wood when holes are acceptable. Confirm cord fit, surface condition, and installation timing before buying; those details determine whether lights stay neatly supported.


Write Your Review
No reviews yet. Be the first to share your experience!